Building Settings Pages
Creating WordPress Settings pages with Piklist is as easy as creating any other field type. First we register the Settings page, and then we start adding Settings sections. Piklist uses the standard WordPress settings API, plus it adds extra power and ease of use. You can use any Piklist field type on a Settings page, and easily add Tabs as well.
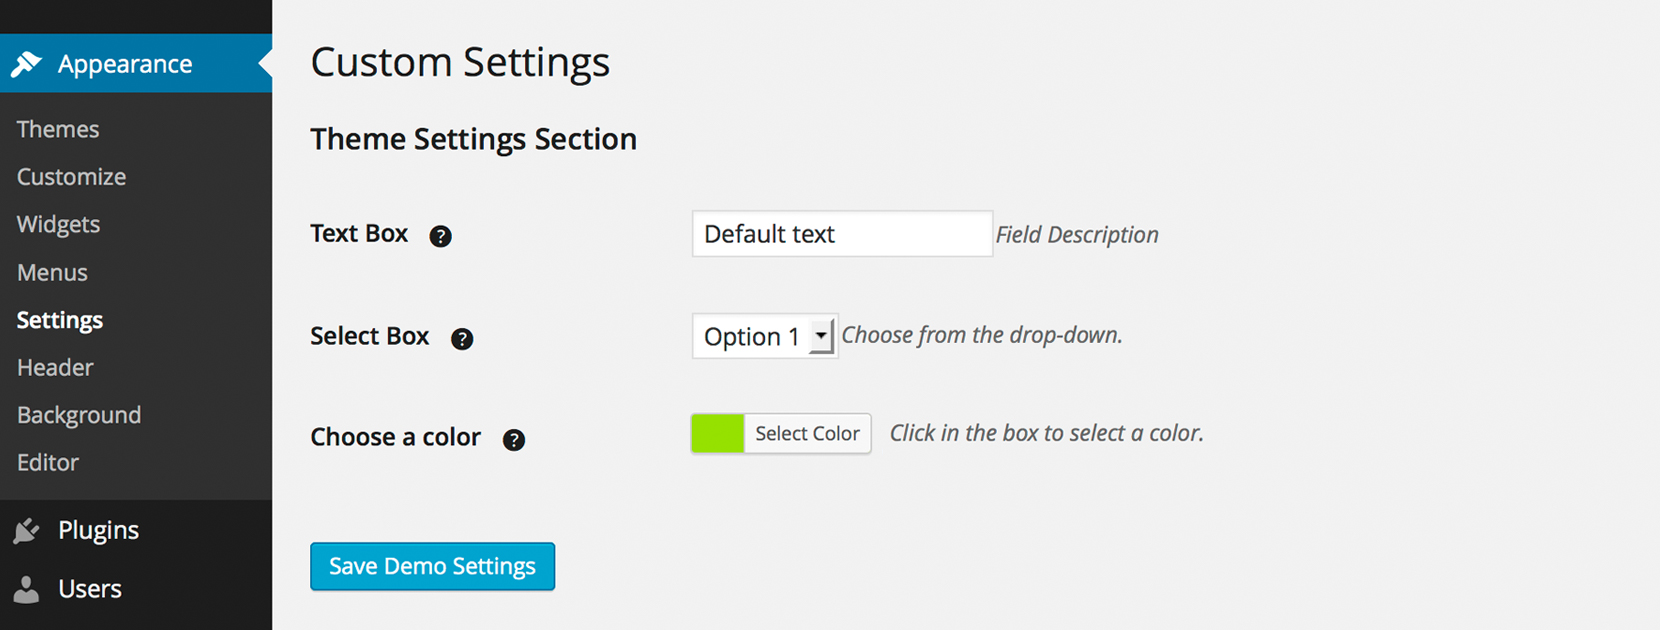
In this tutorial, we will create a Settings Page that includes three fields: select, text and colorPicker, with tooltip help.
Register your Settings Page
Like everything in Piklist, we start with a simple but powerful array. Then we hook it to the proper Piklist function. If you’re creating this settings page in your theme then this code belongs in functions.php. If this is a Settings page for a plugin, then add it to the main file in your plugin, after you register your plugin with Piklist.
add_filter('piklist_admin_pages', 'piklist_theme_setting_pages');
  function piklist_theme_setting_pages($pages) {
     $pages[] = array(
      'page_title' => __('Custom Settings')
      ,'menu_title' => __('Settings', 'piklist')
      ,'sub_menu' => 'themes.php' //Under Appearance menu
      ,'capability' => 'manage_options'
      ,'menu_slug' => 'custom_settings'
      ,'setting' => 'my_theme_settings'
      ,'menu_icon' => plugins_url('piklist/parts/img/piklist-icon.png')
      ,'page_icon' => plugins_url('piklist/parts/img/piklist-page-icon-32.png')
      ,'single_line' => true
      ,'default_tab' => 'Basic'
      ,'save_text' => 'Save Demo Settings'
    );

    return $pages;
  }
Create a Settings Section
Now we need to create the proper folder structure in your theme. Piklist uses this folder structure to automatically help you when building fields. Create a piklist folder, and then a parts subfolder, and then add a settings subfolder. You can see the supported Piklist folder structure here. Each file we add to the the settings folder will create a Settings section on the Settings page. You can have multiple Sections on each Settings page as well. Each field we include in this file will be part of this Section. Fairly straightforward. OK, let’s create our Settings section file!
- Create a new file: let’s call it
demo-settings.php. At the top of the file, we will add a comment block that will control the configuration of the Settings section. This comment block is very similar to what you would see in a standard WordPress plugin or theme. Here are the minimum variables required:
<?php
/*
Title: Theme Settings Section
Setting: my_theme_settings
*/
This comment block tells Piklist you want to name your Settings section, “My Demo Settings Section”, and you want to associate this Section with the Settings page that uses the setting “demo-setting”. When you registered your Settings page, earlier in this tutorial, this is the setting you defined. The Piklist comment block for settings supports a lot more than just these two variables. You can view the full list in our docs.
- Now, let’s create our first field, a TEXT BOX:
piklist('field', array(
    'type' => 'text'
    ,'field' => 'text'
    ,'label' => 'Text Box'
    ,'description' => 'Field Description'
    ,'help' => 'This is help text.'
    ,'value' => 'Default text'
    ,'attributes' => array(
      'class' => 'text'
    )
  ));
This simple array will create a TEXT BOX that automatically uses the WordPress settings API to display and save. The 'type' => 'text' variable tells Piklist what sort of field to render. Also, notice that this is very similar to the way you create fields for metaboxes.
- Now, let’s create our next field, a SELECT FIELD:
piklist('field', array(
    'type' => 'select'
    ,'field' => 'select'
    ,'label' => 'Select Box'
    ,'description' => 'Choose from the drop-down.'
    ,'help' => 'This is help text.'
    ,'attributes' => array(
      'class' => 'text'
    )
    ,'choices' => array(
      'option1' => 'Option 1'
      ,'option2' => 'Option 2'
      ,'option3' => 'Option 3'
    )
  ));
Notice that this array is very similar to the one used to create the text box. Just two differences:
'type' => 'select': Tells Piklist that you want to render a select field.- The
choicesarray adds your choices.
That’s it! Everything else is the same.
- One more field to go in this tutorial. Let’s create our ColorPicker field. Normally, you would need to add Javascript and CSS to create this field… but not with Piklist!
 piklist('field', array(
    'type' => 'colorpicker'
    ,'field' => 'colorpicker'
    ,'label' => 'Choose a color'
    ,'value' => '#aee029'
    ,'description' => 'Click in the box to select a color.'
    ,'help' => 'This is help text.'
    ,'attributes' => array(
      'class' => 'text'
    )
  ));
Seriously, that’s all you need to create a ColorPicker field. You will notice this is pretty much the same code used to create the text box, except we set 'type' => 'colorpicker'.
Full code snippet
 /*
 Title: Theme Settings Section
 Setting: my_theme_settings
 */
piklist('field', array(
  'type' => 'text'
  ,'field' => 'text'
  ,'label' => 'Text Box'
  ,'description' => 'Field Description'
  ,'help' => 'This is help text.'
  ,'value' => 'Default text'
  ,'attributes' => array(
  'class' => 'text'
  )
 ));

piklist('field', array(
 'type' => 'select'
 ,'field' => 'select'
 ,'label' => 'Select Box'
 ,'description' => 'Choose from the drop-down.'
 ,'help' => 'This is help text.'
 ,'attributes' => array(
 'class' => 'text'
 )
 ,'choices' => array(
   'option1' => 'Option 1'
   ,'option2' => 'Option 2'
   ,'option3' => 'Option 3'
 )
 ));

piklist('field', array(
 'type' => 'colorpicker'
 ,'field' => 'colorpicker'
 ,'label' => 'Choose a color'
 ,'value' => '#aee029'
 ,'description' => 'Click in the box to select a color.'
 ,'help' => 'This is help text.'
 ,'attributes' => array(
  'class' => 'text'
 )
 ));
Using these fields in a theme:
Where possible, Piklist uses the default WordPress functions to get things done, and using Settings is no different. You can use the standard WordPress function get_option to pull this data into your theme. Here’s how you would use these fields in your theme file:
$theme_options = get_option('my_theme_settings');

  $text_field = $theme_options['text'];
  $select_field = $theme_options['select'];
  $colorpicker_field = $theme_options['colorpicker'];

  echo 'This is a text field' . $text_field;