Getting Started with Meta-boxes and Fields

Description
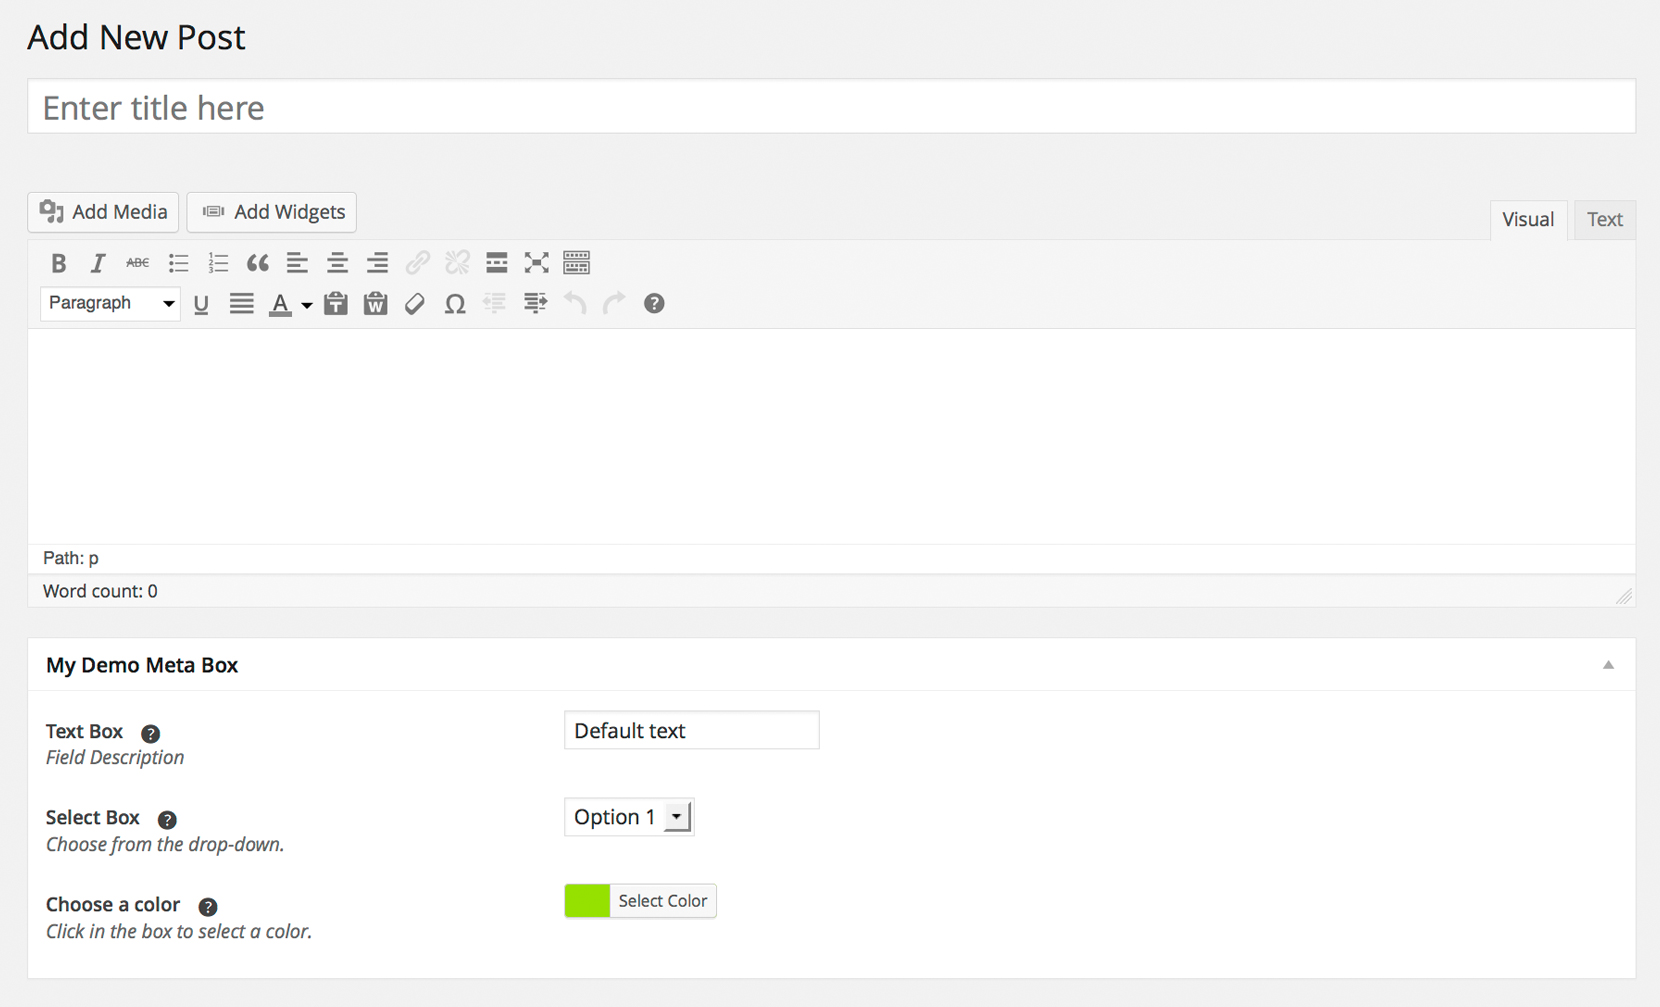
Piklist makes it radically easy to add meta-boxes and fields to your posts, pages or custom post types. In this tutorial, we will create a metabox that includes three fields, select, text and ColorPicker, for standard posts.
Each file we add to the the meta-boxes folder will create a metabox on the post edit screen. Each field we include in this file will be part of this metabox. Fairly straightforward. Ok, let’s create our metabox file!
Create a new file: let’s call it demo-metabox.php. At the top of the file, we will add a comment block that will control the configuration of the metabox. This comment block is very similar to what you would see in a standard WordPress plugin or theme. Here are the minimum variables required:
<?php
/*
Title: My Demo Metabox
Post Type: post
*/
This comment block tells Piklist you want to name your metabox, “My Demo Metabox”, and have it display on the edit screen for a Post. To have this metabox work with a custom post type, you could also add a custom post type slug here as well. The Piklist comment block for metaboxes supports a lot more than just these two variables. You can view the full list in our docs.
Now we start adding our fields. It’s best practice to make the “field” name all lowercase letters, numbers, and dashes or underscores, with no spaces or special characters if possible (i.e. facebook-page-url). The field label can be anything you want.
Let’s create our first field, a text box:
piklist('field', array(
    'type' => 'text'
    ,'field' => 'demo_text'
    ,'label' => 'Text Box'
    ,'description' => 'Field Description'
    ,'value' => 'Default text'
    ,'help' => 'This is help text.'
    ,'attributes' => array(
      'class' => 'text'
    )
  ));
This simple array will create a text box that automatically saves as Post Meta.
Now, let’s create our select field:
piklist('field', array(
    'type' => 'select'
    ,'field' => 'demo_select'
    ,'label' => 'Select Box'
    ,'description' => 'Choose from the drop-down.'
    ,'help' => 'This is help text.'
    ,'attributes' => array(
      'class' => 'text'
    )
    ,'choices' => array(
      'option1' => 'Option 1'
      ,'option2' => 'Option 2'
      ,'option3' => 'Option 3'
    )
  ));
Notice that this array is very similar to the one used to create the text box. Just two differences:
- type => select: Tells Piklist that you want to render a select field.
- The choices array adds your choices.
That’s it! Everything else is the same.
One more field to go in this tutorial. Let’s create our ColorPicker field. Normally, you would need to add Javascript and CSS to create this field… but not with Piklist!
piklist('field', array(
    'type' => 'colorpicker'
    ,'field' => 'demo_colorpicker'
    ,'label' => 'Choose a color'
    ,'value' => '#aee029'
    ,'description' => 'Click in the box to select a color.'
    ,'help' => 'This is help text.'
    ,'attributes' => array(
      'class' => 'text'
    )
  ));
Seriously, that’s all you need to create a ColorPicker field. You will notice this is pretty much the same code used to create the text box, except we set ‘type’ => ‘colorpicker’.
Full Code Snippet:
<?php
/*
Title: My Demo Metabox
Post Type: post
*/

piklist('field', array(
  'type' => 'text'
  ,'field' => 'demo_text'
  ,'label' => 'Text Box'
  ,'description' => 'Field Description'
  ,'value' => 'Default text'
  ,'help' => 'This is help text.'
  ,'attributes' => array(
    'class' => 'text'
  )
));

piklist('field', array(
  'type' => 'select'
  ,'field' => 'demo_select'
  ,'label' => 'Select Box'
  ,'description' => 'Choose from the drop-down.'
  ,'help' => 'This is help text.'
  ,'attributes' => array(
    'class' => 'text'
  )
  ,'choices' => array(
    'option1' => 'Option 1'
    ,'option2' => 'Option 2'
    ,'option3' => 'Option 3'
  )
));

piklist('field', array(
  'type' => 'colorpicker'
  ,'field' => 'demo_colorpicker'
  ,'label' => 'Choose a color'
  ,'value' => '#aee029'
  ,'description' => 'Click in the box to select a color.'
  ,'help' => 'This is help text.'
  ,'attributes' => array(
    'class' => 'text'
  )
));
Usage
Where possible, Piklist uses the default WordPress functions to get things done, and using Post Meta is no different. You can use the get_post_meta() function to pull this data into your theme. Here’s how you would use these fields in your single.php file:
echo get_post_meta($post->ID, 'demo_text', true);
echo get_post_meta($post->ID, 'demo_select', true);
echo get_post_meta($post->ID, 'demo_colorpicker', true);
get_post_meta() takes a second parameter, which can be set as true or false. Set to true if you want only a single row from the database, or false if you want every row it finds that matches the meta name.