Creating Custom Post Statuses
Custom Post Statuses are at the heart of any web application built with WordPress, and Piklist makes it easy for you to implement them. No longer are you stuck with draft, pending review and published. You can add whatever post statuses you choose.
A few important caveats:
- Due to the nature of WordPress, your first post status has to remain “draft”. You can change the label so it displays “New”, or “Howdy”, but the key in the post status array will have to remain draft (we’ll explain more later in the tutorial).
- Some themes may not display your post if the status is not published, so you may have to modify your theme’s loop to show it.
- This parameter does not ADD statuses to the Post Type, it removes the default WordPress statuses and REPLACES them.
Like most items in Piklist, we will use an array of values to add our Custom Post Statuses. Piklist has a bunch of parameters to use with Custom Post Types, the one we will use is status. Add this to your Custom Post Type you registered with the Piklist filter piklist_post_types:
'status' => array(
   'draft' => array(
     'label' => 'New'
   )
)
This code tells Piklist to rename the draft status to New. Due to the nature of WordPress, your first status must always be draft. We just renamed it to New.
The second post status just gets added to this array. The “Request for Estimate” status looks like this:
'status' => array(
   'draft' => array(
     'label' => 'New'
   )
   ,'estimate' => array(
     'label' => 'Request for Estimate'
)
You’ve just created post status named “estimate”, with the label “Request for Estimate”.
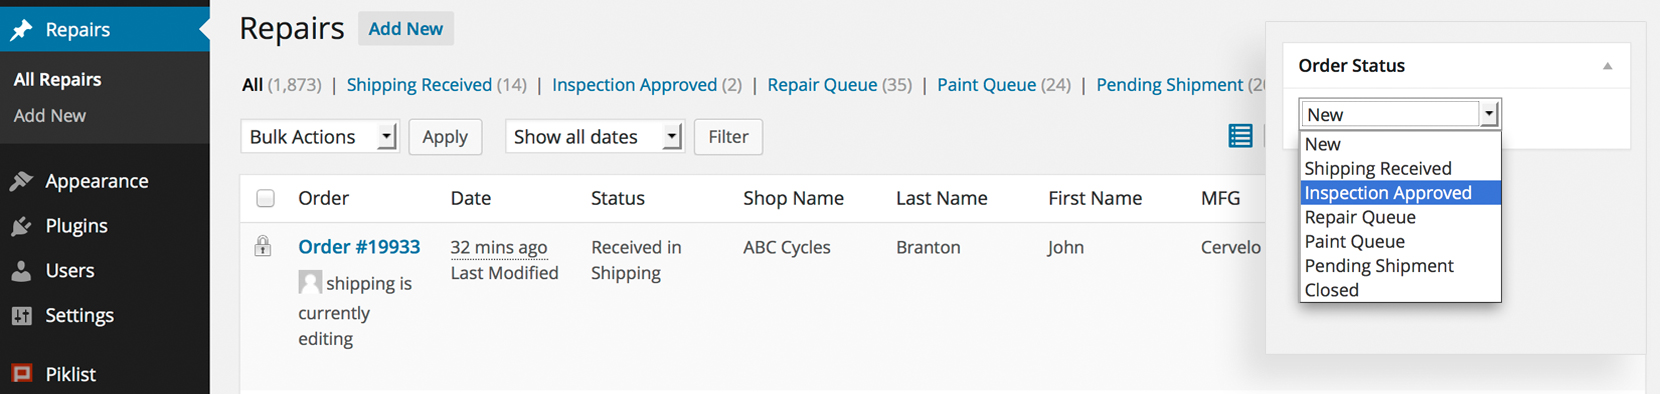
Just continue adding your statuses to the array until you’re done. Here’s the full code snippet for creating the Custom Post Type from step 1, and adding in all the post statuses from the image above:
add_filter('piklist_post_types', 'demo_post_type');
 function demo_post_type($post_types)
 {
  $post_types['demo'] = array(
    'labels' => piklist('post_type_labels', 'Demo')
    ,'title' => __('Enter a new Demo Title')
    ,'public' => true
    ,'rewrite' => array(
      'slug' => 'demo'
    )
    ,'supports' => array(
      'author'
      ,'revisions'
    )
    ,'hide_meta_box' => array(
      'slug'
      ,'author'
      ,'revisions'
      ,'comments'
      ,'commentstatus'
    )
    ,'status' => array(
        'draft' => array(
          'label' => 'New'
        )
        ,'shipping-received' => array(
          'label' => 'Shipping Received'
        )
        ,'inspection-wfa' => array(
          'label' => 'Inspection: Waiting for Approval'
        )
        ,'inspection' => array(
          'label' => 'Inspection Approved'
        )
        ,'work-order-pca' => array(
          'label' => 'Work Order, PCA'
        )
        ,'repair-queue' => array(
          'label' => 'Repair Queue'
        )
        ,'paint-queue' => array(
          'label' => 'Paint Queue'
        )
        ,'jbp-paint-queue' => array(
          'label' => 'JBP Paint Queue'
        )
        ,'shipped' => array(
          'label' => 'Pending Shipment'
        )
        ,'closed' => array(
          'label' => 'Closed'
        )
      )
  );
return $post_types;
}
Custom Post Statuses in Piklist take the same parameters as the WordPress function register_post_status. They get passed in an array as seen below:
,'closed' => array(
	'label' => 'Closed',
	'public' => true,
	'exclude_from_search' => true,
	'show_in_admin_all_list' => true,
	'show_in_admin_status_list' => true
)