Getting Started
Getting Started with Piklist
To get the most out of this tutorial you should have a recent version of WordPress running and the Piklist plugin installed and activated. If you are not running WordPress locally, then you will need FTP access to your site so you can upload files.
What is Piklist?
At its very basic level, Piklist is a rapid development framework for WordPress. When using Piklist to build your WordPress themes or plugins, you will be able to build more powerful, flexible websites with less code.
You install and activate Piklist like any other WordPress plugin. It is absolutely free. Built-in demos are included, so you can see some of the features of Piklist in action.
Piklist is a code-based framework, which means it has no user interface. We believe this is one of the biggest benefits to using Piklist. Code based systems allow you flexibility in your field configurations and development, and will save you time in the long run. With Piklist you can usually use the same code you have written in one section and use it in another, allowing you to copy and paste, and save tons of time.
We’ve worked hard to make Piklist easy to use for beginners, and powerful enough for developers… and our users all agree!
About this Tutorial
Piklist is an incredibly powerful framework for WordPress. This tutorial only covers one feature of Piklist… adding custom fields. There is a lot more that Piklist can do, so check out the rest of the User Guide when you’ve finished this tutorial.
Let’s get started!
You can easily create your project in a new or existing plugin, or your theme. In this tutorial we’ll create the project in your theme.
Piklist Folder Structure
To help keep your code organized, Piklist uses a pre-defined folder/file structure that makes it easy for you to add functionality to your site.
Piklist utilizes a folder for each major section of WordPress. You create these folders in your theme or your plugin and place the appropriate files in them. Piklist will automatically load these files correctly.
IMPORTANT: You create the folder structure in YOUR theme or YOUR plugin, NOT in Piklist itself. Choosing to create the folder structure in your theme or plugin is a matter of preference. For example, if you may change themes in the future, then a plugin is a better option. However, if you choose a plugin, then you need to first create a WordPress plugin, before adding the Piklist folder structure.
Folder Structure for your theme
If you want to use your theme for your Piklist files, open your theme’s main folder and add a folder called “piklist”. Inside that folder add another called “parts” and then add any Piklist folders you will need. Your folder structure should look like this:
/theme-folder
  /piklist
    /parts
      /admin-pages (Do not use for settings pages)
      /dashboard
      /help
      /media
      /meta-boxes
      /notices
      /pointers
      /settings
      /terms
      /updates
      /users
      /widgets
      /workflows
Folder Structure for your plugin
You can also create a Piklist plugin if you want. The folder structure is slightly different than the one for a theme. Open your plugin’s main folder and add a “parts” folder. In that folder add any folders you will need. Your folder structure should look like this:
/plugin-folder
  /parts
    /admin-pages (Do not use for settings pages)
    /dashboard
    /help
    /media
    /meta-boxes
    /notices
    /pointers
    /settings
    /terms
    /updates
    /users
    /widgets
    /workflows
When creating a plugin you need let Piklist know this plugin depends on it. In the comment block of your main plugin file, you need to add: Plugin Type: Piklist. So your comment block should look something like this:
/**
 * Plugin Name: Name Of The Plugin
 * Plugin URI: http://URI_Of_Page_Describing_Plugin_and_Updates
 * Description: A brief description of the Plugin.
 * Version: The Plugin's Version Number, e.g.: 1.0
 * Author: Name Of The Plugin Author
 * Author URI: http://URI_Of_The_Plugin_Author
 * Plugin Type: Piklist
 */
A more detailed doc on writing Piklist plugins can be found here: Writing a Plugin for Piklist
Grouping fields
Overview
Now that we have our folder structure set up, it’s time to add some files. Each file you add to a parts folder will contain your fields. These files allow you to group fields together and you can also have multiple files in each parts folder. For example, each file in the “meta-boxes” folder will create a metabox for a Post Type. Each file in the “users” folder will create a user field section. Each file in the “widgets” folder will create a Widget (yes, you can easily create widgets with Piklist). [TODO: ADD LINK]
Comment blocks
Configuration options for each field group are defined in the comment block at the top of each file. These comment blocks are similar to what WordPress uses for plugin headers. They allow you to easily configure a group of fields with no hooks or filters.
A full list of Comment Block parameters can be found here.
Create a new file in your “meta-boxes” folder called my-fields.php. At the top of the file, add this comment block:
<?php
/**
 * Title: My custom fields
 * Post Type: post
 */
In this comment block you just defined two configuration parameters: Title: The title of your metabox. Post Type: Which post type(s) should display this metabox.
Save the file. Now open WordPress and go to “Add new Post”. You should see an empty metabox with the title “My custom fields”. You just created your first metabox with Piklist!

Configuration Options
The comment block at the top of each parts file defines configuration options for a field group. Each field type (i.e. metaboxes, settings, widgets, etc) have different configuration options. Some configuration parameters can take multiple values. For example, the “Post Type” parameter can accept multiple Post Types separated by commas.
Change the “Post Type” parameter to this: Post Type: post, page so your code will look like this:
<?php
/**
 * Title: My custom fields
 * Post Type: post, page
 */
Save the file. Open WordPress and add a new Page. You will see the same empty metabox that you added to Posts. Using this method you can easily use the same field code to multiple Post Types.
Adding Fields
Overview
Piklist fields can be added almost anywhere in WordPress by using a very simple function. In most cases, the code you use to create a field in one area of WordPress can be used in all other areas as well. So, for example, if you already created a field for a Post Type and you also wanted to use it for a User Profile page, you can just copy and paste it.
Fields
Now that we created our metabox, it’s time to add some fields. Under the comment block add the following field code so your file looks like this:
<?php
/**
 * Title: My custom fields
 * Post Type: post, page
 */

piklist('field', array(
  'type' => 'text'
  ,'field' => 'field_one'
  ,'label' => 'First Field'
));
The piklist(‘field’) function accepts tons of parameters. This example used just three:
type: The type of field. In this case “text”.
field: The name of the field. This is where the field data will be saved in the database.
label: A label that displays next to the field.
Save the file. Go back to WordPress and add a new Post or a new Page. You will see a text field with the label “First Field” in your metabox.

Add more fields
Now go back to your file, copy the field code (not the comment block), and paste it under the first field. Change the type to colorpicker, the field parameter to ‘field_two’, and the label to ‘Second field’. Your file should now look like this:
<?php
/**
 * Title: My custom fields
 * Post Type: post, page
 */

piklist('field', array(
  'type' => 'text'
  ,'field' => 'field_one'
  ,'label' => 'First Field'
));

piklist('field', array(
  'type' => 'colorpicker'
  ,'field' => 'field_two'
  ,'label' => 'Second Field'
));
Save the file. Go back to WordPress and add a new Post or Page. You now have two fields: a text box and a colorpicker.

Click inside the field and a color palette will pop up. You just created a colorpicker field by copying your existing text field code and making a few small changes.
Utilizing the same code everywhere.
As mentioned in the Tutorial introduction, one of the biggest benefits of Piklist is that it’s a code-based framework. You can easily copy and paste your code from one object type to another.
Copy and Paste programming
In the “users” folder you created in step 3, create a new file. Now open the file in your “meta-boxes” folder, select everything and copy. Open the file in your users folder and paste. The file in your “users” folder should be an exact duplicate of the one that’s in your “meta-boxes” folder.
Since Users aren’t a Post Type, delete the line in your comment block that says: Post Type: post, page. Your file should look like this:
<?php
/**
 * Title: My custom fields
 */

piklist('field', array(
  'type' => 'text'
  ,'field' => 'field_one'
  ,'label' => 'First Field'
));

piklist('field', array(
  'type' => 'colorpicker'
  ,'field' => 'field_two'
  ,'label' => 'Second Field'
));
Press save. Open WordPress and edit any users profile. You will see this field under the section “My custom fields”.
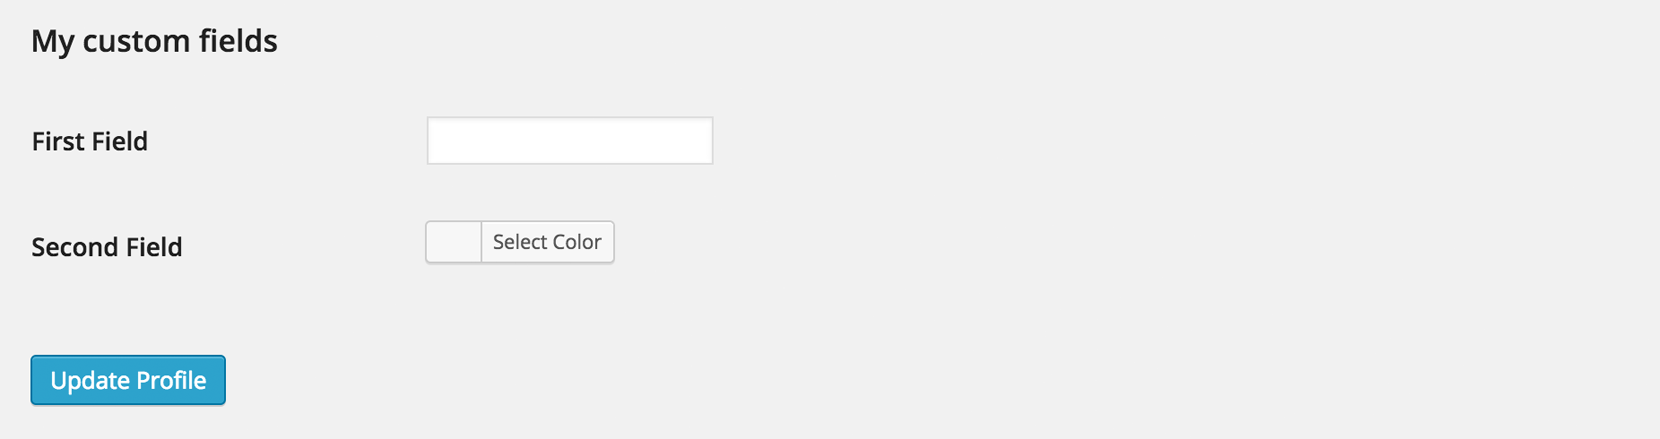
You just utilized the same code for a User Profile, that you wrote for a Post Type. This is a huge time saver and you will find this feature invaluable.
Built-in Demos
Now that you understand how easy it is to create fields with Piklist, we’re sure you’re excited to get started. To help you along, Piklist comes with built-in demos that contain tons of field configurations that you can easily copy and paste into your own project. You can learn more about Piklist Demos here.
Video Overview
The initial public unveiling of Piklist at WordCampNYC 2012.